

Angular
ng generate component XXX'组件名字'
ng g c '组件名称'
基本语法
import { Component,OnInit } from '@angular/core';
@Component({
selector: 'app-myc02',
templateUrl: './myc02.component.html',
styleUrls: ['./myc02.component.css']
})
export class Myc02Component implements OnInit {
constructor(){
}
/*
ngOnInit 等于mounted生命周期
*/
ngOnInit(): void {
}
}
<!---->
<h2>Products</h2>
<div *ngFor="let product of products">
<h3>
<a [title]="product.name + ' details'">
{{ product.name }}
</a>
</h3>
<p *ngIf="product.description">
Description: {{ product.description }}
</p>
<button (click)="share()">
Share
</button>
</div>
<div [ngSwith]="值">
<! 都没满足时候默认 可以多个同时展示>
<pre *ngSwitchDefault>ng generate component xyz</pre>
<pre *ngSwitchCase="'符合值'">ng add @angular/material</pre>
<pre *ngSwitchCase="'符合值'">ng add @angular/pwa</pre>
<pre *ngSwitchCase="'符合值'">ng add _____</pre>
<pre *ngSwitchCase="'符合值'">ng test</pre>
<pre *ngSwitchCase="'符合值'">ng build</pre>
</div>
子组件给父组件传值
先给父组件定义事件
showData(msg: '') {
console.log('msg', msg);//红红
}
再在父组件定义事件渠道
<app-children-data (msgEvent)="showData($event)"></app-children-data>
msgEvent代表传递给子组件的事件名
子组件通过@output接收
@Output() msgEvent = new EventEmitter();
传递过来的事件名
使用
<button (click)="msgEvent.emit('红红')">喜欢红红</button>
双向绑定
父给子传值@Input
<app-children-data [age]="19" firstName="小明" [boss]="{name:'小亮',age:33,sex:'男'}"></app-children-data>
就像vue v-bind把属性放在子组件上
子组件通过@Input XXX传递过来的名字
直接使用
自定义指令
增加自定义指令
ng generate directive 指令名
ng g d 指令名
做一个获取焦点指令
import { Directive, ElementRef } from '@angular/core';
@Directive({
selector: '[appFocus]',
})
export class FocusDirective {
// 全自动获取,指令写在哪个标签上,对应的元素就会作为参数传递到构造器中
constructor(e: ElementRef) {
console.log(e);
let input = e.nativeElement; //此时绑定的是input所有获取的就是input
input.focus(); //原生focus聚焦方法
}
}
管道
内置管道
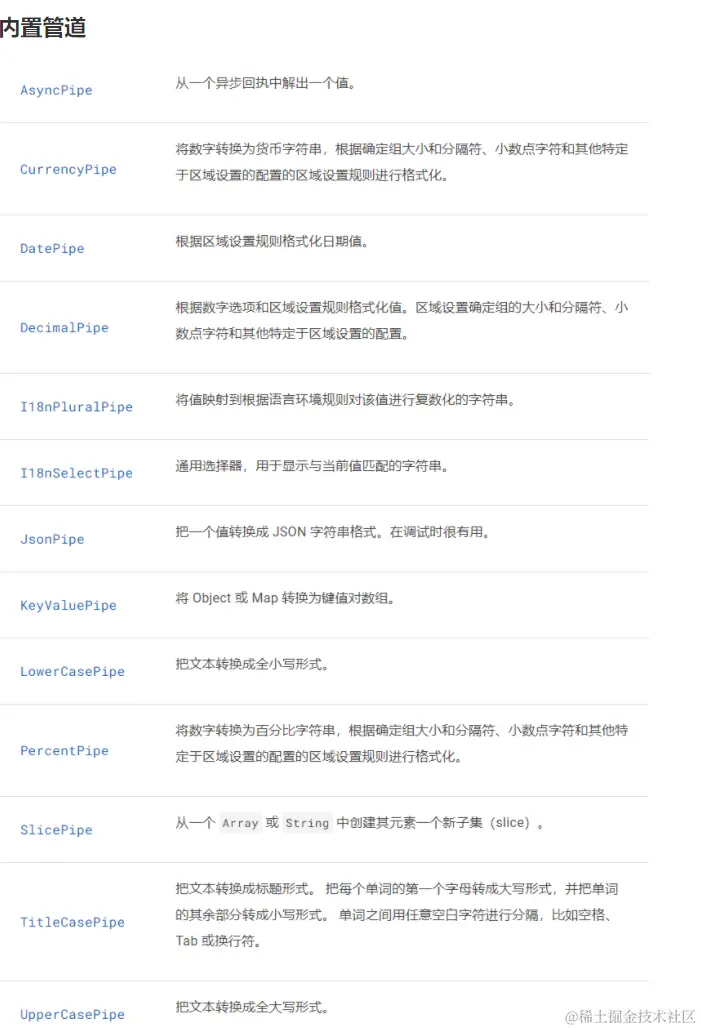
例如
<li>大写{{'hello'|uppercase}}</li>
<li>首字母大写{{'name is zhang xue'| titlecase}}</li>
<li>百分数{{0.555555|percent:'2.2'}}</li>
//percent第一个值整数个数,第二个小数点后的数(四舍五入)
生成自定义管道
命令
ng g p 管道名
使用
import { Pipe, PipeTransform } from '@angular/core';
@Pipe({
name: 'sixChange',
})
export class SixChangePipe implements PipeTransform {
transform(value: number, lang: string = 'zh'): any {
// return value == 0 ? '男' : '女';
if (lang == 'zh') {
if (value == 0) return '男';
if (value == 1) return '女';
} else if (lang == 'en') {
if (value == 0) return 'man';
if (value == 1) return 'woman';
}
}
}
<!---->
<h1>自定义管道</h1>
<table border="1">
<thead>
<th>序号</th>
<th>名字</th>
<th>性别</th>
<th>性别</th>
</thead>
<tbody>
<tr *ngFor="let i of pipiData;let in = index">
<td>{{in+1}}</td>
<td>{{i.name}}</td>
<td>{{i.sex|sixChange}}</td>
<td>{{i.sex|sixChange:'en'}}</td>
</tr>
</tbody>
</table>
<!---->
pipiData = [
{ name: '小明', sex: 0 },
{ name: '小红', sex: 1 },
{ name: '小亮', sex: 0 },
];
ts回顾
class demo {
public aa = '1';
protected bb = 2;
private cc = 3;
get a() {
return this.cc;
}
set b(val: number) {
this.cc = val;
}
}
let xx= new demo()
xx.aa
xx.bb//只能在demo内访问和继承的子类访问
xx.cc//只能在demo内访问
xx.a
xx.b=6
class ddd extends demo{
constructor(){
super()
}
get q(){
return this.bb
}
get f(){
return this.cc//只能在demo内访问
}
}
常用生命周期
constructor:构造方法,组件出生的第一时间触发
ngOnInit:组件中的内容开始初始化
ngAfterContentInit:组件中的数据初始化时触发
ngAfterViewInit:组件上的UI界面初始化时
ngAfterContentChecked:组件上的数据变化时
ngAfterViewChecked:组件上的UI随着数据变化而更新
ngOnDestroy:组件销毁
服务
命令行
ng generate service xxx
ng g s xxx
//name.service.ts
import { Injectable } from '@angular/core';
@Injectable({
providedIn: 'root',
})
export class NameService {
name = ['小明', '小红', '小亮'];
movies = ['八百', '僵尸世界大战', 'spiderMan'];
constructor() {}
}
//serve.component.ts
import { Component } from '@angular/core';
import { NameService } from './name.service';
@Component({
selector: 'app-serve',
templateUrl: './serve.component.html',
styleUrls: ['./serve.component.css'],
})
export class ServeComponent {
// 构造方法:类实例化时自动触发,接收默认参数,进行初始化赋值
// 此处的参数 names 就是依赖声明
// 代表要想实例化当前类必须传入一个字符串类型的值
names: NameService;
constructor(names: NameService) {
this.names = names;
}
ngOnInit() {
// console.log(this.names.name);
}
}
//语法糖写法
//格式 权限词 变量名 服务给的类型名
//权限词: public protected private 公开 子类 内部
//自动生成属性并赋值
constructor(public names: NameService){}
网络请求
import { HttpClient, HttpHeaders } from '@angular/common/http';
import { Component } from '@angular/core';
//和双向绑定 一样需要手动加载注入
@Component({
selector: 'app-http-api',
templateUrl: './http-api.component.html',
styleUrls: ['./http-api.component.css'],
})
export class HttpApiComponent {
res: any;
// 网络请求服务需要依赖注入
constructor(public httpApi: HttpClient) {}
ngOnInit() {
console.log(this.httpApi);
// subscribe:订阅请求的返回值
this.httpApi.get('').subscribe((res) => {
this.res = res;
});
}
// get请求:地址?参数
// post请求:地址和参数分开传递(url,body,options) 地址,参数,配置请求设置
// options:headers
// options={
// headders:new HttpHeaders({
// 'content-type':'application/x-www-form-urlencoded'
// })
// }
}
路由
路由基础配置
也需要引入import { RouterModule } from '@angular/router';
<!---->
import { NgModule }from "@langular/core" ;
import { RouterHodule,Routes }from "@angular/router " ;
import { Homecomponent] from './home/home. component'
import {Hellocomponent} from "./hello/hello.component"
//路由配置
const routes: Routes = [
{
path: " ",
component:HomeComponent
{
path: "home" ,
component:HomeComponent,
{
path: "he11o",
component :Hellocomponent,
}
//通配
{
path: '**',
component :HomeComponent
}
@NgModule({
imports: [ RouterModule.forRoot(routes)],
exports:[RouterModule]
)}
路由导航
<!--路由导航-->
<a [routerLink]='/home'>home</a>===<router-link to='home'></router-link>
angular vue
<!--路由视图渲染输出-->
<router-outlet></router-outlet> === <router-view></router-view>
嵌套路由
const routes:Routes=[
{
path:'home',
component:XXX组件名,
children:[
{path:'hello',component:xxx}
]
}
]
//路由懒加载
loadComponent: () =>import('./app.component').then((mod) => mod.AppComponent)
//在非父组件跳转需要写全路径
路由传参
query
<a [routerLink]="xxx" [queryParams]="{id:3}" routerLinkActive="类名"></a>
在a标签中添加参数queryParams可以通过this.routerinfo.snapshot.queryParams获取参数
routerLinkActive代表路由是否活跃 活跃时启用类名
<!---->
import{ActivatedRoute} from '@angular/router'
constructor(private routerinfo:ActivatedRouter){}
ngOnInit(){
this.id=this.routerinfo.snapshot.queryParams['id']
}
params
//需要在路由路径上添加
{
path:'xxx/:id'
}
<!---->
<a [routerLink]="['/xxx','XXXXXX参数']">xxx</a>
<!---->
ngOnInit(){
this.routerinfo.params.subscribe((parmas:Params)=>{
this.name=params['name']
})
}
js跳转路由
在ts文件中引入router,并在构造函数中注入,然后通过this.router.navigate()进行跳转
import { Component, OnInit } from '@angular/core';
import { Router} from '@angular/router'
export class ProductComponent implements OnInit {
constructor(
public router: Router
) { }
ngOnInit(): void {
}
goProductDetail() {
// 普通路由和动态路由都适合
this.router.navigate(['/productDetail/', '1234'])
}
goHome() {
this.router.navigate(['/home'])
}
}
query传参
import { Router,NavigationExtras} from '@angular/router';
export class ProductComponent implements OnInit {
constructor(
public router: Router
) { }
ngOnInit(): void {
}
goNews() {
// 跳转并进行get传值
// 引入这个NavigationExtras可以更标准一点
let queryParams: NavigationExtras = {
queryParams:{'aid':123}
}
// 注意此时第要传递的参数是放在中括号外面的。
this.router.navigate(['/news'], queryParams);
}
}608
路由守卫
//创建guard类
ng g guard xxxx
ng g g xxxx
<!---->
import { CanActivateFn, Router } from '@angular/router';
export const authGuard: CanActivateFn = (route, state) => {
let router = new Router();
console.log(state.url);
if (!(state.url == '/login')) {
if (localStorage.getItem('s_t')) {
return true;
}
router.navigate(['/login']);
return false;
} else {
return true;
}
};
//使用直接导入在需要的地方
path: 'contairpage',
component: ContairPageComponent,
canActivate: [authGuard],//加上这一句
```bash
ng generate guard 守卫名
简写形式
ng g g 守卫名
```
路由守卫示例 - 认证守卫
```typescript
import { CanActivateFn, Router } from '@angular/router';
import { inject } from '@angular/core';
export const authGuard: CanActivateFn = (route, state) => {
// 注入 Router 服务
const router = inject(Router);
console.log('当前访问路径:', state.url);
// 如果不是登录页,则检查登录状态
if (state.url !== '/login') {
const token = localStorage.getItem('token');
if (token) {
return true; // 已登录,允许访问
}
// 未登录,重定向到登录页
router.navigate(['/login']);
return false;
} else {
return true; // 登录页,允许访问
}
};
```
使用路由守卫
```typescript
const routes: Routes = [
{
path: 'dashboard',
component: DashboardComponent,
canActivate: [authGuard] // 应用认证守卫
},
{
path: 'profile',
component: ProfileComponent,
canActivate: [authGuard] // 应用认证守卫
},
{
path: 'login',
component: LoginComponent
}
];
```
其他常用命令
| 命令 | 功能 |
|------|------|
| ng serve | 启动开发服务器 |
| ng build | 构建生产版本 |
| ng test | 运行单元测试 |
| ng e2e | 运行端到端测试 |
| ng add @angular/material | 添加 Angular Material |
| ng add @angular/pwa | 添加 PWA 支持 |